Animation In Matplotlib
Tue, 10 Oct 2023
I made this animation in matplotlib (inspired by these). Over the past few months I've managed to explore (to varying degrees) a few different tools to create animations through code.
Skip to the meat and potatoes of how to animate stuff in matplotlib
P5.js
This was I think the very first animation library that I used.
I heard about it from a friend and jumped at the chance to try it out when a school project called for creating a visualization. Recently while reading the 3 Body Problem books I was inspired to create these 2 simulations.
- In this one I added damping and corrective forces to ensure that the 3 bodies continue to perform a dynamic dance
- In this one I avoided adding any damping and corrective forces to see what the Trisolaran system might actually look like
Manim Community
I came across Manim because of 3Blue1Brown. For a long time I've admired how well he breaks down and builds up any topic that he covers, but his video animation is just

So I tried to create some animations like him. Earlier this summer I created an animation to show a kind of error that can happen at the Data Link Layer of a network connection if the acknowledgement window size for packets is larger than half the acknowledgement packet ids being used.
Do note 3Blue1Brown uses a different fork of the Manim Library. I used the Community fork and it was pretty good.
Matplotlib
I've been using matplotlib to visualize data as charts and graphs for a good while now. But it was only recently that I was prompted to try and animate the visualized data. My first approach was based on how I saw Manim created its animation. Manim looked like it created frames and partial animations then stitched them together using ffmpeg. So my first approach to animating matplotlib was to save a plot for every frame that I wanted to animate then stitch them together. This works and I'd recommend it if you have already written the code that can plot the frames your interested in plotting and animating. However, if your about to write that code, I'd recommend reading the rest of this blog so you can use matplotlib.animation.FuncAnimation
The Meat And Potatoes of FuncAnimation
Its late I'm sleepy I'll write this later. I'm sorry if you needed this right now 😴🙇
It's later, so I'm writing it now.
There are 2 fair ways I've seen to animate stuff in matplotlib.
- FuncAnimation: Use a function to modify plot on every frame
- ArtistAnimation: I didn't get around to properly understanding this one
But according to matplotlib FuncAnimation is more efficient than the later. ArtistAnimation is supposed to be more flexible but FuncAnimation is flexible enough for the things I've tried. So thats what I use.
I'll demo FuncAnimation by showing how it can be used to produce this animation
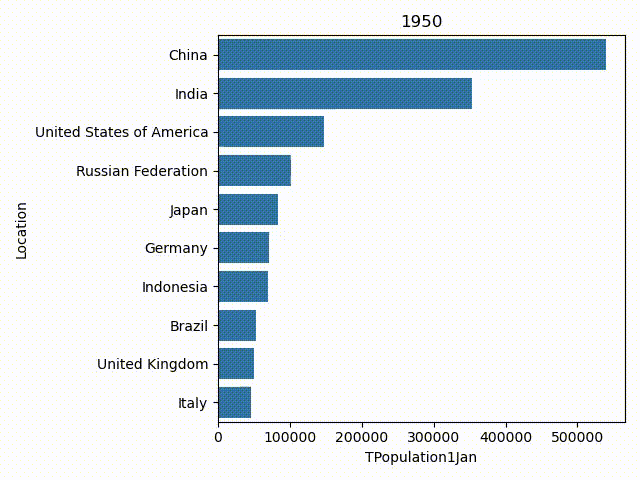
Quick tangent to cover the data
This data is the Worldwide Population Data and I got it on Kaggle. Its a tabular data set about historical population trends and I think even predictions based on those trends.
This dataset has population records not only by countries but also by geographic regions, development levels, and more.
For this demo I selected the total population of only those records which were of countries.
Back to animation
The code to create this animation is quite small. Also I'm assuming that you have at least some experience with python.
import matplotlib.pyplot as plt
import seaborn as sns
import matplotlib.animation as anime
import pandas as pd
import numpy as np

def main():
    df = pd.read_csv('data/WPP2022_Demographic_Indicators_Medium.csv')
    df2 = df.loc[df.LocTypeName=='Country/Area', ['TPopulation1Jan', 'Location', 'Time']]
    fig, ax = plt.subplots()
    def topPopulations(year, present_year, n):
        ax.clear()
        ax.set_title(("Prediction: " if present_year < year else "") + str(year))
        sns.barplot(ax=ax, data=df2.loc[df2.Time==year, ['TPopulation1Jan','Location']].sort_values(by='TPopulation1Jan', ascending=False).iloc[:n], x='TPopulation1Jan', y='Location')
        fig.tight_layout()

    ani = anime.FuncAnimation(
        fig=fig,
        func=topPopulations,
        frames=df2.Time.unique(),
        fargs=(2023, 10)
    )
    plt.show()

if __name__=='__main__':
    main()
There are 2 significant sections in this code. The first is the topPopulations() functions, and the second is the anime.FuncAnimation(...) constructor call.
These 2 sections demonstrate the style in which FuncAnimation animates a plot. You start out with an initial figure, and you make a function that can modify the existing figure into the required figure for a frame. Over here that function is topPopulations().
Given the year that is to be animated, the present year, and the number of countries to display in the graph, topPopulations() will create a bar graph of the top n most populous countries. If the population is a prediction of the future then it will set the title to reflect that.
# Look it over again
fig, ax = plt.subplots()
def topPopulations(year, present_year, n):
    ax.clear()
    ax.set_title(("Prediction: " if present_year < year else "") + str(year))
    sns.barplot(ax=ax, data=df2.loc[df2.Time==year, ['TPopulation1Jan','Location']].sort_values(by='TPopulation1Jan', ascending=False).iloc[:n], x='TPopulation1Jan', y='Location')
    fig.tight_layout()
FuncAnimation(...) then uses the topPopulations() function to animate the figure. FuncAnimation(...) takes 3 main arguments; The figure to animate, The function that will animate, and frames. The first 2 act as you might expect but frames actually has some flexibility to behave in a few different ways.
frames could be the number of frames to animate, or it could be an iterable of identifiers for each frame. In this demo it's an iterable of years. It's a list of all the years that need to be animated. The frames will also be the first argument passed on to the function that will modify the figure. It can be used by the function the determine which frame needs to be drawn and therefore which modification should be made. If the modification function needs some more arguments they can be given to FuncAnimation(...) in the fargs parameter. FuncAnimation(...) will pass these same arguments to the modification function for every frame.
Now call plt.show() and matplotlib will work its magic. Ooohh once you have the ani object you can also call ani.save('population.mp4') instead of plt.show() to save the animation instead of displaying it. Just make sure to have ffmpeg on your environment if you want to save the file as mp4. If not you'll have to save it as a gif. And that's it. That covers everything about using FuncAnimation(...).

Oh ya, there's the good old blit that I almost forgot about. blit is a parameter in FuncAnimation(...). Using and not using blit can make a difference like this
| Without blit | With blit |
|---|---|
 |  |
blit is able to speed up the animation process by selectively rerendering only the parts of the graph that change. If a part of the graph does not change, then there is no need to spend time rerendering it. To use it however you do need to do a little extra work in how you write out the animation function. The animation function will normally just modify the matplotlib figure to match the current frame. To use blit the animation function must also return a list of changed artists. FuncAnimation(...) will use this to rerender only the parts of the graph that changed from frame to frame.
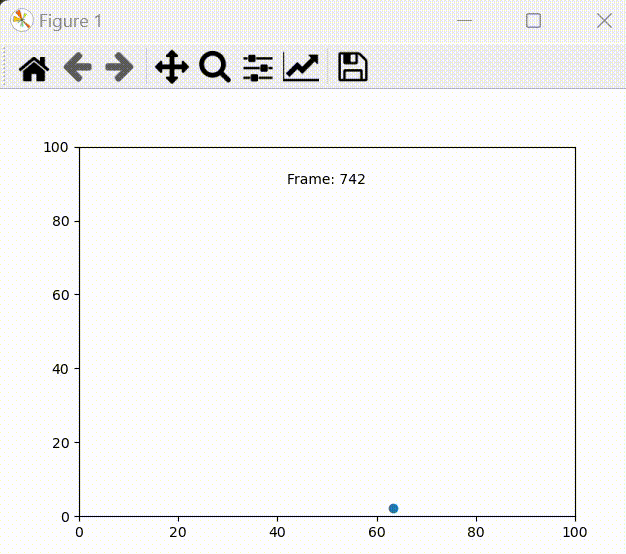
Lets look at the code that animated that bouncy ball
fig, ax = plt.subplots()
ax: Axes = ax  # I'm just doing this so my intellisense will realize that ax is a Axes object
                        # Thats really helpful as it it'll now know how to autocomplete the objects functions
xlim = (0,100)
ylim = (0,100)
ax.set_xlim(*xlim)
ax.set_ylim(*ylim)

pos = np.array([50.0,50.0])
vel = np.random.random_sample(2)
acc = np.array([0.0, -1.0])

scatter_artist = ax.scatter(*pos)
time_text = ax.text(50, 90, "Some Text", ha='center')

def time_step(i):
    global pos, vel, acc
    pos += vel
    bounce=False
    if pos[0] < xlim[0] or pos[0] > xlim[1]:
        vel[0]*=-1
        bounce=True
    if pos[1] < ylim[0] or pos[1] > ylim[1]:
        vel[1]*=-1
        bounce=True
    if not bounce:
        vel += acc
    scatter_artist.set_offsets(pos)
    time_text.set_text('Frame: '+i)
    return [scatter_artist, time_text]

ani = anime.FuncAnimation(
    fig=fig,
    func=time_step,
    frames=1000,
    interval=1,
    # blit=True # Uncomment to enable blit
)
plt.show()
Notice that in the time_step() function I'm not calling ax.clear() or ax.scatter() or ax.set_title(). Instead ax.scatter() and ax.text() gets called only once outside of the time_step() function. I take what they return (scatter_artist and time_text) and modify those returned objects in the time_step() function. These objects are Artists. Basically they are responsible for holding data and drawing that data on the graph. For instance a PathCollection (returned by ax.scatter) is responsible for holding and drawing all the scatter points on the graph. A Text (returned by ax.text) is responsible for holding and drawing text on the graph. Here's a helpful list of collections (sub class of artist) that you can use in your animations.
The other thing you will notice is that time_step() returns scatter_artist and time_text in a list. Doing so lets FuncAnimation(..) know which artists were changed and therefore which artists need to be rerendered. If you forget this step FuncAnimation(...) will not animate the changed made by time_step(). One caveat I've encountered is that while bliting FuncAnimation(...) does not rerender title text. On reading a little I think its because only the artists inside the plot are rerendered if blit is enabled. Since the title is displayed outside the limits of the plot, it gets ignored while rerendering.
You can clone my repo to run the demo as a script or inspect it as a notebook. The repo also has a demo of using blit with FuncAnimation(...). Doing so speeds up the animation by a lot.